Deploying a Gatsby Dev Blog on Github Pages
July 22, 2022
Today we will deploying the new Gatsby-based dev blog that we worked through setting up here.
Today, we will just deploy to Github Pages, mostly just because it is free and presumably fairly easy to set up.
Our main goal at the moment is just to get something up that we can easily add content and deploy changes to.
1. Setup Github Repo and SSH
Create yourself a new, empty repository on Github. Locally, the Gatsby CLI should already have initialized a git repository for us. If not, git init.
Create an SSH key (with your own email)
ssh-keygen -t ed25519 -C 'your@own-email.com'eval "$(ssh-agent -s)"ssh-add ~/.ssh/id_ed25519
Copy the output of cat ~/.ssh/id_ed25519.pub to the clipboard, paste it here and save it, then verify things are working by running:
ssh -T git@github.com
Add a remote and push our code to Github.
git remote add origin git@github.com:your/own-repo.gitgit push --set-upstream origin master
At this point we should have our code live on Github in our master branch.
Now, we can just commit our changes and git push, and our code with go straight to the master branch on Github.
2. Configure Github Pages
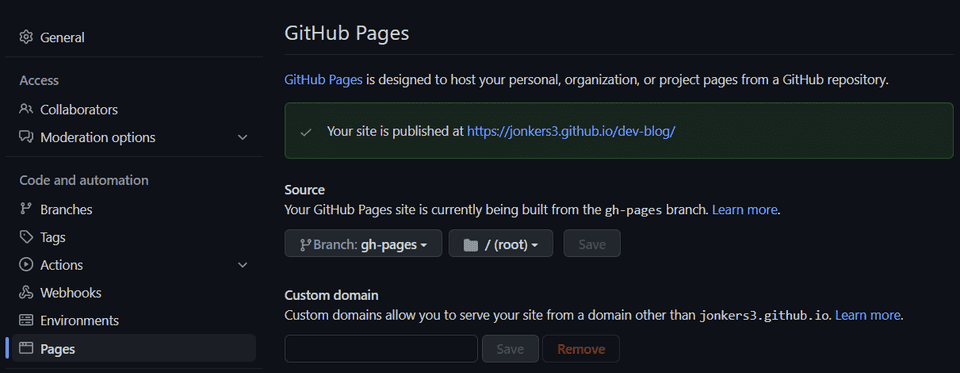
On the settings page for your Github repository, make sure that branch is set to gh-pages and that selected folder is root, like this:
Gatsby is not the default for Github Pages, but it can still work, and Github Pages Action looks like just the sort of thing that might make this easy. The only thing we need to do to leverage it is create the following yml file, which is a slightly modified version of the Gatsby example provided in their docs:
name: GitHub Pageson:push:branches:- masterpull_request:jobs:deploy:runs-on: ubuntu-20.04permissions:contents: writeconcurrency:group: ${{ github.workflow }}-${{ github.ref }}steps:- uses: actions/checkout@v3- name: Setup Nodeuses: actions/setup-node@v3with:node-version: '18'- name: Cache dependenciesuses: actions/cache@v2with:path: ~/.npmkey: ${{ runner.os }}-node-${{ hashFiles('**/package-lock.json') }}restore-keys: |${{ runner.os }}-node-- run: npm ci- run: npm run build- name: Deployuses: peaceiris/actions-gh-pages@v3if: ${{ github.ref == 'refs/heads/master' }}with:github_token: ${{ secrets.GITHUB_TOKEN }}publish_dir: ./public
Once those things are setup correctly, that should be it. When the master branch is updated on Github (as in when you call git push), it will trigger the workflow, and the process will culminate in a new version of our site being deployed to Github Pages.
3. Update gatsby-config with path prefix
Due to the nature of our Github Pages setup which entails our site root located in a subfolder, we need to make the one more change to ensure that all of our images and links are working right in the pages Gatsby generates.
The value for our pathPrefix is, of course, the name of the Github repository. We don't need the path prefix in our development environment, so we can control whether it is set but using environment variable:
"scripts": {"build": "PATH_PREFIX=/dev-blog gatsby build --prefix-paths","build": "gatsby build",},
pathPrefix: process.env.PATH_PREFIX,
4. Commit changes and push to Github
It turns out to be as easy as that. Push the rest of your changes and things should be good to go.
git add -A && git commit -m 'initial deploy'git push
At this point, the blog should be looking good on Github Pages. Have fun with your new Gatsby blog!
